Augmented Reality with JavaScript, part one
A colleague from marketing came back from a motor show recently with some augmented reality promotional material from one of the vendors. When they suggested that we make something similar for the conferences we attend I took it as a personal challenge!
You know the sort of thing - the company hands out fliers together with a link to a mobile app. The flier by itself looks quite plain and boring. But if you install the app on your phone or tablet and look at the flier through the device’s camera, then it suddenly springs to life with 3D models and animations. Here’s an example…
They can be very effective and engaging, but surely to implement something like this requires lots of platform specific SDKs and native coding, resulting in quite different codebases for the different types of devices you want to support? Well, it turns out that’s not necessarily true…
In this post I’ll go through a first attempt at doing some augmented reality in the browser (yes - you heard right…augmented reality in the browser) using three.js and JSARToolkit. Then, in the second part I’ll go through an alternative using PhoneGap with the wikitude plug-in to produce something more suited to mobile devices, (but still primarily using JavaScript and HTML).
A first attempt with JSARToolkit and three.js
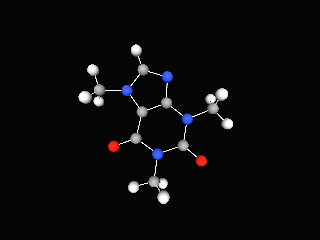
I’d already been playing around with three.js and used it to create some 3D chemical structures. I’m sure you recognise this caffeine molecule - you may even have it printed on your coffee mug…
…so this seemed like a reasonable candidate to try pairing up with some augmented reality.
JSARToolkit is a JavaScript port of a Flash port of a Java port of an augmented reality library written in C called ARToolkit. (Did you follow that? …never mind, it’s not important!).
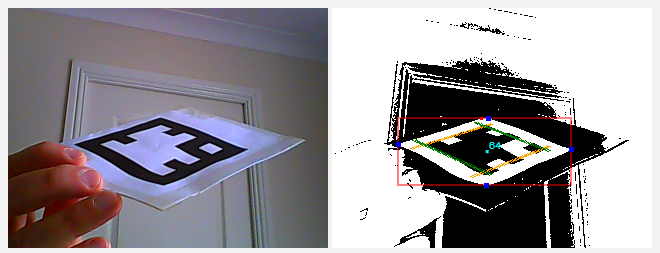
To use it you give it a <canvas> element containing an image. The toolkit analyses this image for known markers. It will then provide you with information about the markers it detected, including their transform matrices. You can see an example below. The image used as input to the toolkit is on the left and the results of its image analysis on the right.

TIP: While working with the toolkit you can add a canvas to your page with
id="debugCanvas"and defineDEBUG = truein your JavaScript. The toolkit will then use this canvas to display debug information from its image analysis, as shown in the above right image.
You then use this information to ‘augment’ the original image…
- Get the transform matrix from a detected marker and apply it to your three.js object
- Draw the input image into your three.js scene
- Overlay your transformed object
The main thing you need to know is how to convert the toolkit’s matrices into something that three.js understands. There are two transforms you need to apply…
- The three.js camera that you use for rendering the scene needs to have the same projection matrix as the detector, and,
- The three.js object that you want to line up with a marker needs to have the same transform matrix as the marker.
I must confess that my understanding of 3D transform matrices is sketchy,[1] but I was able to use the demonstration in this article to make a couple of helper functions to convert the matrices to the appropriate three.js form.
Use this for setting the three.js camera projection matrix from the JSARToolkit’s detector…
THREE.Camera.prototype.setJsArMatrix = function (jsArParameters) {
  var matrixArray = new Float32Array(16);
  jsArParameters.copyCameraMatrix(matrixArray, 10, 10000);

  return this.projectionMatrix.set(
    matrixArray[0], matrixArray[4], matrixArray[8],  matrixArray[12],
    matrixArray[1], matrixArray[5], matrixArray[9],  matrixArray[13],
    matrixArray[2], matrixArray[6], matrixArray[10], matrixArray[14],
    matrixArray[3], matrixArray[7], matrixArray[11], matrixArray[15]
  );
};
Here’s an example of how you use it…
// The JSARToolkit detector...
var parameters = new FLARParam(width, height);
var detector = new FLARMultiIdMarkerDetector(parameters, markerWidth);

// The three.js camera for rendering the overlay on the input images
// (We need to give it the same projection matrix as the detector
// so the overlay will line up with what the detector is 'seeing')
var overlayCamera = new THREE.Camera();
overlayCamera.setJsArMatrix(parameters);
And, to set the three.js object transform matrix from a marker detected by the toolkit…
THREE.Object3D.prototype.setJsArMatrix = function (jsArMatrix) {
  return this.matrix.set(
     jsArMatrix.m00,  jsArMatrix.m01, -jsArMatrix.m02,  jsArMatrix.m03,
    -jsArMatrix.m10, -jsArMatrix.m11,  jsArMatrix.m12, -jsArMatrix.m13,
     jsArMatrix.m20,  jsArMatrix.m21, -jsArMatrix.m22,  jsArMatrix.m23,
                  0,               0,               0,               1
  );
};
…with an example of its usage:
// This JSARToolkit object reads image data from the canvas 'inputCapture'...
var imageReader = new NyARRgbRaster_Canvas2D(inputCapture);

// ...and we'll store matrix information about the detected markers here.
var resultMatrix = new NyARTransMatResult();

// Use the imageReader to detect the markers
// (The 2nd parameter is a threshold)
if (detector.detectMarkerLite(imageReader, 128) > 0) {
  // If any markers were detected, get the transform matrix of the first one
  detector.getTransformMatrix(0, resultMatrix);

  // and use it to transform our three.js object
  molecule.setJsArMatrix(resultMatrix);
  molecule.matrixWorldNeedsUpdate = true;
}

// Render the scene (input image first then overlay the transformed molecule)
...
Now, imagine putting that in an animation loop, and using the WebRTC API to update the inputCapture canvas on each frame from the user’s webcam video stream, and you’ve pretty much got real-time streaming augmented reality!
You can see how I’ve put it all together in [this code here] (http://molecules3d.apphb.com/scripts/AR_mediastream.js) (or, view the full project on GitHub).
If you can use WebGL and WebRTC then you can print out this marker…
…and try it out.
Ok, so it is a bit rough and I’ve clearly still got some work to do but I still find it pretty impressive that you can even do anything like this in the browser! There is one obvious drawback with this approach though…It’s all very well holding up a marker to your webcam and seeing the augmented image reflected back to you, but it’s not really the same experience as looking at the scene ‘through’ your mobile device and seeing the augmentation appear on your ‘line of sight’. Unfortunately, mobile browsers don’t support the experimental features that this relies on…(yet?)
As I mentioned at the start of the post, PhoneGap with the wikitude plug-in provides an alternative more suited to mobile devices, (but still primarily using JavaScript and HTML). I’ll go through some of that next time. (I’m trying to get out of the habit of writing ridiculously long blog posts!) But, if you can’t wait, the code for an Android version is here on GitHub.
1. There's some good information in this stackoverflow answer, but I think I'm going to have to read it a couple more times to get it to sink in!
comments powered by Disqus
About
I work as a Software Developer at Nonlinear Dynamics Limited, a developer of proteomics and metabolomics software.
My day job mainly involves developing Windows desktop applications with C# .NET.
My hobby/spare-time development tends to focus on playing around with some different technologies (which, at the minute seems to be web application development with JavaScript).
It’s this hobby/spare-time development that you’re most likely to read about here.
Ian Reah


